
You may have heard knitting and felting. Before this, all process requires carding the wool. Usually, the wool obtained from the sheep is matted and tangled which makes it hard to work with. This is where the carding takes place.
Carding is the process of separating the dirt from the wool and aligning the wool in the same direction using carding machines like hand carder, drum carder, and many more. Carding of wool was first recorded in France around the 13th century. They used wooden paddles where nails were placed in rows. Later the nails were replaced by cloth with thin wires with evenly spaced rows. Nowadays it is called hand carder.
Wool carding has made the job easier for many who work with wool. Here are the purposes why wool is carded.
- Detangle and remove the clumps of wool by separating them into individual fibers.
- Removing the unwanted debris like vegetable matter, seeds, dirt from the wool.
- Prepare the wool for smooth spinning by producing strands of wool roving after removing little knots.
- To align the wool parallel to each other.
- Blend different colored wool or different types of fiber.
There are two types of carding. We will discuss both of them in detail below.
Carded wool is not only used for woolen spinning but also serves other different purposes like felting. adding design to any woolen projects or sewing projects. Nowadays we can find different ways that wool can be carded. Mostly there is the traditional way and the mechanical way which is faster compared to the traditional way.
Hand Carding (Traditional Method)
In the traditional method physical power is used for carding the wool. This method requires great upper arm strength as it can be a bit tiring as you keep on carding. But with practice, you can improve and increase your upper arm strength. As you become aware of the correct method to card the wool then you will get more used to it a
You don’t need a lot of materials for hand carding the wool. With a few right materials, you are good to go for this process.
Wool
Choosing the right wool is crucial for the carding process. As a beginner, you should choose wool with longer strands of fiber as it is easy to work with. A freshly shorn wool is also prone to be dirty which can make the carding process difficult. The wool should be washed before carding to remove the dirt as possible and the natural grease that is found in the wool called Lanolin. You can card the greasy wool but the cleaned version is better if you are a beginner as the grease may prevent the wool from being carded nicely.
Later in the carding process, we are going to talk about how to wash the wool correctly.
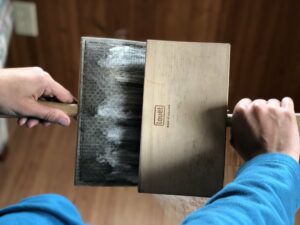
Hand Carder
We need a pair of hand carders for the carding process. They are wooden paddles with cloth pins attached to the paddles. The pins are placed equally spaced and when the carder are pulled against each other it forms a smooth lock on the fiber. They kind of resemble the brush used for brushing the pet hair. So don’t be a mistake between pet brush and hand carder.
We can find different types of hand carders based on the purpose. Mostly there are two types of wool and cotton. They differ depending on the fiber it is used for. For the wool carding process, you need the carder especially made for the wool. They also come either flat-backed or curved back. So according to your preferences, you can choose the hand carder.
Hand carders are also available in different sizes ranging from two by two inches to ones four by eight inches. The density of pins or the teeth also varies, the finer you want your fiber to be the density of the pins also increases. So simply depending on the length, weight, and characteristics of the fiber, the amount of teeth needed per inch of carder is also determined.
Choosing the right-sized hand carder as a beginner can be confusing. Small carders can be easy to handle but cannot hold much fiber. We recommend you to use a regular hand carder like a medium or fine-gauge wool carder. Even if you don’t have great upper arm strength, you can work with the fiber more easily and you can also get used to working with the carders.
Flick Carders
This type of carder is the smallest version of a hand carder. It is not justification for the process but it can make your job easy at the end of the carding process. As the name suggests, this type of carder is used to flick the end of the carded wool or to tease out some hair for spinning off.
Preparing the wool
Before any carding process, we need clean wool. Not to be confused with clean wool. This process is necessary as the freshly shorn wool tends to be very dirty and has so much dirt which makes the carding process difficult. The presence of grease called Lanolin also makes the job hard as the wool is very greasy to work with. The cleaning method is easy and can be performed at home with few materials.
Removal of Superficial Dirt
Shake off any superficial dirt like seeds, vegetation, and dust as much as possible. This helps reduce any excess dirt during the cleaning process.
Preparing mild cleansing solution
Fill a bucket or any bowl with warm water. Do not use hot water as wool is prone to shrinkage when in contact with heat. Warm water with a temperature of around 180°F (82°C)is best for cleaning the wool. Mix mild cleansing detergent or soap in the water to form a cleaning solution. Avoid using cleansing material that includes bleach or any whitening additives in them. This type of cleaning detergent and soap can be easily found in the markets or shops near you.
Submerging the wool
Soak the wool in the cleansing solution that you have prepared. It is best to let it soak for about 10 minutes. This helps break down the dirt or any unwanted substances and the grease. After letting it soak, you can rub gently to remove any harsh dirt. Do not use any hard scrubbing action when cleaning the wool as it may hamper the quality of the wool. It can also weaken the durability of the wool.
It is better to use your hand when rubbing and scrubbing as you have more control over the cleaning process. Repeat the soaking process until the dirt is cleaned from the wool.
Rinsing and drying the wool
Rinse the wool using cold water and throw the dirty water. Rinse until the water runs clear. Even when you are rinsing, squeeze the excess water out rather than wringing it hardly.
First of all, place the cleaned wool on a dry clean towel and push out excessive water. This allows for the wool to dry faster. After that lay it flat on another dry towel and let it air dry. Do not use any artificial heat like a dryer when drying the wool. You can card the wool after it is completely dried.
Carding Process
The hand carding process has simple ways. Anyone who is a beginner can learn the basics easily. If they follow every method carefully rather than rushing themselves then they can card easily in a short time. Be prepared with the required materials as mentioned above. A pair of hand carders and wool of your choice.
Placement of carder
You need two hand carder. You will be using both hands when carding. One carder is placed teeth or pin side facing up and another is placed facing down. One facing up is called a standard card and the one facing down is a working card.
First of all, you put the standard card on your lap for support. It is placed opposite to your dominant hand, if you are right-handed then the handle is on the left side but if you are left-handed then the handle is on the right side. You get the idea right.
Laying wool
Lay a thin layer of wool on the standard carder. The wool should be completely dried after the cleaning process. The wool fiber should touch the pin cloth and should cover the teeth of the carder. Do not overload the carder as it makes it hard when carding. And don’t let any excessive wool hang from the carder. If there is any bald spot then cover it using another thin layer of wool. This helps card the wool uniformly.
Carding the wool
Now take the working carder in your dominant hand and start carding. The working carder should face downward and start brushing from the top. Do not brush with excessive force, start gently so you can reach every fiber in the standard carder. Look for a free edge when brushing and work your way brushing gently in one direction from up to down.
The pin grabs onto a few fibers at a time and transfers them into the working carder aligning in the same direction. Don’t press hard to complete the carding process fast but do it slowly and gently. After brushing for few times the fiber will be transferred to the working carder. If you look closely at the fiber then it will be more smoothed and aligned than before.
Refining the carded wool
Now the carder with wool is placed on the lap and is now the standard carder and the empty one becomes the working carder. You repeat the process again and again until the wool is completely smoothened and aligned straightly. You also notice that the remaining dirt from the wool is also removed and you have a clean sheet of wool.
Making a Rolag
Use a flicker card or the hand carder itself to flick the edge of completely carded wool. Start from the top of the carder and gently lift the wool. Roll the lifted wool into a burrito. This burrito-shaped carded wool is called rolag. this is now ready for woolen spinning into a ball of yarn and other purposes.
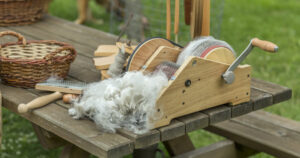
Drum Carding (Mechanical method)
This is one of the fastest ways to card wool in large amounts at a time. Simply a machine called a drum carder is used to card the wool. You may be wondering,
Drum carder is a tabletop machine that mostly includes two cylindrical drums covered with coarse and fine metal pins like the hand carder which rake through the wool to form smooth aligned wool rolag to be spun into yarn and also to use for other wool projects. This type of machine is either manually run by spinning using hands or on the motors that run on electricity or battery.
Many prefer drum carders because they can card both raw and washed wool into smooth roving. It is time-saving and efficient compared to the traditional method.
Understanding TPI
Before using a drum carder you need to understand about teeth per inch(TPI). The TPI helps determine whether your drum carder is suitable for the particular textured wool. It helps you whether your drum carder will work on the coarse, fine, or medium-textured fiber. TPI generally measures how densely the teeth or pins are packed together. A TPI of 72 generally falls in the normal range, the higher the number is finer, and the smoother the fiber becomes.
Here I have mentioned different card cloths with different TPI and their uses.
- Coarse: 45-54 TPI, used for more of an open fiber.
- Regular: 72 TPI, normally used and can accommodate a range of fibers. It is suitable for coarse to medium range fibers.
- Fine: 90-120 TPI, can be used for many fibers but not recommended for fine fibers.
- Extra fine: 190-255 TPI, especially for fine varieties of fiber.
Required materials
The list of materials is a bit more than the traditional method. A few small materials are needed to ease the job.
Wool
The wool should be completely dried before carding. It is not necessary for the wool to be cleaned or washed as the mechanical carder has the potential of even carding the raw wool.
Drum Carder
As I have mentioned above, a drum carder is a machine that is either handled manually or either runs on an electric motor. Drum carders have two cylindrical-shaped drums, one is large and another one is smaller. It consists of a handle to spin the carder if it doesn’t run on the motor and a feeding tray to feed wool to the carder.
Drum carders are available in different sizes ranging from 8″ wide to 16″ wide. The size determines the amount of wool and the duration it takes the machine to the card. They also come with a brush attachment. This helps increase the carding ability of the machine. Not all drum carders have this brush attachment but you can add for to make the job easy.
Doffer Brush
This type of brush is also called a cleaning brush. It is used to clean the carders and drum carders. When the wool is left into carders for a long period then it can attract wool moths and can be unsanitary. If you are working with different colors of wool at once then this is crucial for the carding process. It prevents any unwanted mixing of the colors as well.
Doffer pin
This pin is simply used to remove any batt from the drum carder.
Batt Picker
It is another variation of the doffer pin. This helps protect your knuckle from painful contact with the teeth of the drum when removing the batt.
Carding Process
The carding process using the drum carder is quite easy. it is not very difficult to use the machine. You don’t need to be a mechanical expert when using the machine.
Placing Wool
Place a small amount of wool on the feeding tray. Just make sure the tip of the wool touches the small drum. Lay a thin layer of wool covering the feeding tray. if you are working with a large amount of fiber then it is better to wait for the first layer to be passed onto the small drum then add more on the feeding tray. This helps in the smooth carding process.
Run the machine
Turn the handle slowly or run the motor to start the carding machine. The fiber on the feeding table will attach to the small drum and then start carding. Do not turn too quickly and do not hold the fiber on the feeding table when rolling the drum. Continue to feed the fiber into the drum until the bigger drum is full.
When feeding the drum work with thin layers, this helps prevent any bald spots and results in uniform carded wool. Continue carding until the wool reaches the height of the pin or until the drum is full. You can know the drum is full when the wool overflows from the side and the fiber starts to get collected in the small drum.
Separating and removing
After carding is complete use a doffer pin and place it under the carded wool. Do not try to cut the fiber but pull them apart. With little force, you will be able to pull apart the wool.
Slowly and gently pull the fiber from the teeth. Set it aside. Repeat the carding, separating, and removing process until the fiber is according to your desired result. You may need to repeat the process depending on the wool you are using and the result you want to achieve.
Remember,
Carding process is not as complicated you might think it to be. The carding method has also changed a little in the past years making it possible for carding wool in more efficient ways. Carding is so fun. You can try different techniques for different types of wool as you can create different blends 0f fiber and different colors making it suitable for different felting projects as well.
Authentic Handmade Felt Wool Products
If you are seeking authentic handmade felt wool products for yourself and your home, visit www.woollyfelt.com. All of our felt products are crafted by skilled Nepalese women artisans. The wool used is non-toxic, non-allergic, and AZO-free, making it especially suitable for children’s products.
