If you are looking for a hobby, why not try felting. It is fun doesn’t matter what age you are. You can create anything using your imagination and your skill. With the right basics from the start, you can master felting. As a beginner, understanding the process of felting can be a bit puzzling as there are different ways felting can be done. We are going to break down every technique used for felting and its uses.
 After 1st layer is done, lay another thin layer perpendicular to the 1st one. This is very important for the felting process. This helps in binding the fiber strongly which prevents it from being apart even after it is dried. Continue adding more layers until your desired thickness is formed. As you keep on adding layers place them in the alternate direction.
Remember that the wool tends to shrink by 40% after felting is done. So take more wool than compare to the size of sheet that you want. Then place a net or gaze on the wool to prevent any unwanted movement. This also prevents any bald spots in the sheet and it is felted evenly.
After 1st layer is done, lay another thin layer perpendicular to the 1st one. This is very important for the felting process. This helps in binding the fiber strongly which prevents it from being apart even after it is dried. Continue adding more layers until your desired thickness is formed. As you keep on adding layers place them in the alternate direction.
Remember that the wool tends to shrink by 40% after felting is done. So take more wool than compare to the size of sheet that you want. Then place a net or gaze on the wool to prevent any unwanted movement. This also prevents any bald spots in the sheet and it is felted evenly.
 This felting method requires a few more tools compared to the wet felting method. You will need a felting surface, a needle with a barbed end, wool, and a finger guide. Here I have listed a detailed description of materials required for dry or needle felting.
About Felt
Felt is one of the widely used textiles and it is produced by different techniques. The process to make felt is felting. Simply defined, felting is the process of matting, condensing, and pressing fiber to form a stiff and dense cloth by bonding and shrinking the fiber. Different type of external force like heat, agitation, moisture is used to felt the fibers. The felting process dates back to the 6th century BC. The basic techniques used during those time is still used in the present. Some of the oldest pieces were found in the tombs and the burial grounds of Siberia, Scandinavia, and Germany. Normally felting is done in two ways. They are wet felting and dry felting. As their name suggests, in the wet felting process moisture is used in the felting process whereas in the dry felting method we use a special needle to poke down the fiber to form a stiff felt fabric.How to Felt Wool?- Wet Felting
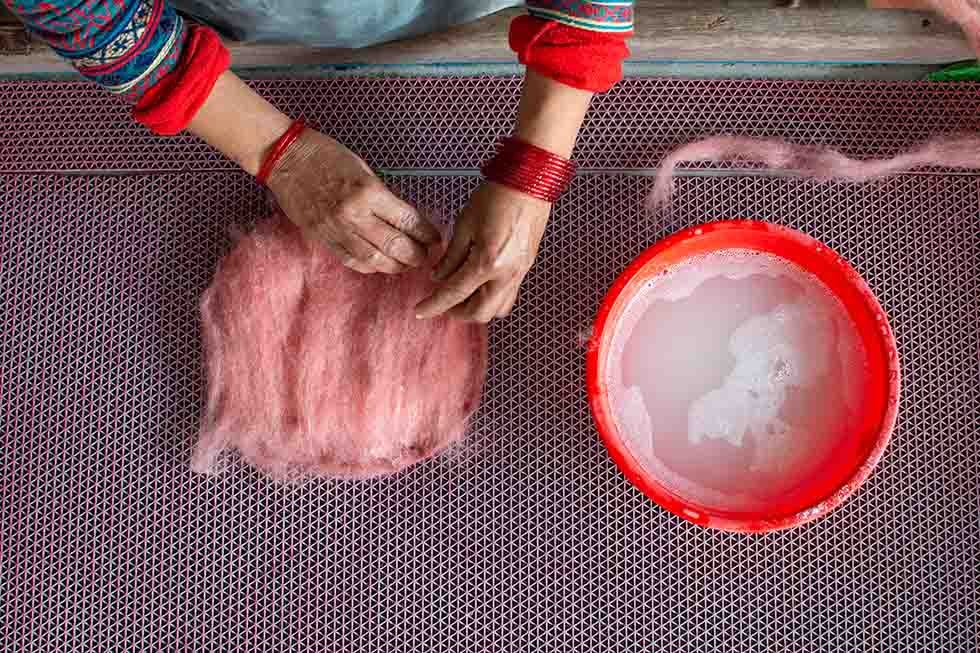
Wet felting is one of the oldest methods of felting. Many still use this technique to make felt fabric. You don’t need a lot of materials when felting. In this process, wool roving is combined to form stiff fabric using warm soapy water. The wool is laid flat on a rough surface and then external force is applied to bind the fiber. Different layers of fiber are placed perpendicular to each other and the soapy water helps the fiber latch onto each other. This method is child-friendly. You can try it with your children at your home as a DIY and craft project.Wet Felting – Required materials
Wet felting doesn’t need a lot of materials. You can start from scratch. Few numbers of right materials and you are good to go. Here I have listed materials that you need for the felting process.Wool
For beginners, you can start with your old sweaters. If you are thinking of getting rid of any type of woolen sweater then you can use it for felting. Sounds nice right. You can reuse the old sweater and turn it into your creation. No waste and great for the environment. But if you don’t have one then we recommend you to buy merino wool from your local market. They can be found easily. We do not recommend acrylic fiber as it doesn’t felt. So be aware not to buy any sort of acrylic fiber. If you want your project to be colorful then you can get yourself your desired colored wool. Dyed wool can work great for the felting project.Felting Solution
The felting solution is simply made of water and soap. Do not use hot water for felting. The wool fibers are prone to shrinkage when in contact with heat. This rushes the felting process and it doesn’t felt properly. Lukewarm water is best for felting. If the water gets cold during the felting process then changing the water is recommended. When felting you need foamy water. Using any kind of mild soap can help you for creating a foamy mixture. Foams also help bind the fiber. As you are working with natural fiber, do not use high chemical contained soap or any detergent. Soap with a bleaching agent is also not recommended.Felting Surface
You need a rough felting surface that can act as a friction base. Friction helps the felting process by increasing the speed. You can reuse the bubble mat that is easily available in your surroundings. Some use a mat made of bamboo as the water can pass easily and has great friction. Depending on the size of the projects, you can either use a rubber mat for the smaller projects or a trunk mat for the bigger projects.Net or Gaze
This is not entirely necessary for the felting process but if you are working with different designs with different colors then it helps prevent any unwanted movement of the placed wool when felting. The wool is unable to move when force is applied. This helps create a clear desired design for your projects.Wet Felting- The Felting Process
As a beginner, you can start by making a felted sheet of felted balls. They are one of the easy projects you can try yourself at home. Here we have listed the ways to feel a sheet of felt fabric.Laying Wool
Place the wool on the felting surface. When laying the wool lay it in thin layers. Each layer should be placed in the same direction. When taking apart the wool from the roving, do not cut using sharp tools. This causes the fiber to shorten in length and it doesn’t felt as nice as you expect it to be. It is better to pull apart the fiber.
After 1st layer is done, lay another thin layer perpendicular to the 1st one. This is very important for the felting process. This helps in binding the fiber strongly which prevents it from being apart even after it is dried. Continue adding more layers until your desired thickness is formed. As you keep on adding layers place them in the alternate direction.
Remember that the wool tends to shrink by 40% after felting is done. So take more wool than compare to the size of sheet that you want. Then place a net or gaze on the wool to prevent any unwanted movement. This also prevents any bald spots in the sheet and it is felted evenly.
Apply Felting Solution
Now saturate the wool with a felting solution made of warm water and soap. The warmth from the solution helps the wool to felt nice. Use a spray bottle rather than pouring the solution directly on the wool and also the water should be enough to saturate the wool rather than dripping wet. If you mistakenly put excess water then take a small sponge to soak up excess water. Remember to make the water foamy, so when you agitate with your hand enough lather is formed.Applying Agitation
This is one of the fun parts of the felting process. Using your hand you apply agitation to the wool. Motions like rubbing, squeezing, and rolling are done to encourage the fiber to stick together. You also have control over how much you felt when you are working with your hands. As you notice the fibers are binding together roll the project around a rolling material like bubble wrap or anything you prefer. Increase the pressure from your hand and roll the fiber. Repeat the motion until the wool is fully felted.Rinsing and Drying
After you have fully felted the wool, now comes the rinsing. Use cold water to rinse out the soap from the felted sheet. One useful tip is to use a water and vinegar mixture to remove the soapy water from the sheet. The vinegar helps break down the soapy components and makes the rinsing job easier. At the end rinse with cold water to remove the vinegar from the felted sheet. Take a clean dry towel to squeeze out the water. The towel absorbs the excess liquid which speeds up the drying process. You will be able to notice the wool has shrunk and has become thicker. Do not use any external heat like blow drying or throwing in the dryer. The heat can further shrink the wool and damage it. It is best to let it air dry. Now your felting sheet is ready after being completely dried. You can use it for many things like a coaster and more. You can also cut the sheet into your desired shape and combine it with your other felting projects.Wet Felting Techniques
At present, there are more revolutionary wet felting techniques introduced over the years. I have mentioned above the steps of the basic wet felting technique. The basic wet felting method is also done to create basic materials like a purse, tote bags, coats, and more. Now let’s look at other felting techniques.Nuno Felting
This type of felting technique was developed by a fiber artist from New South Wales, Australia named Polly String. It was developed around 1992. So it hasn’t been long since it was developed. The technique is quite similar to the basic felting technique. The only difference is that this technique is used to combine wool with sheer fabrics like silk gauze, which creates a lightweight felt. The felt creates different patterns and textures by interlocking itself on the silk fabric giving it unique designs. This technique is mostly used for making lightweight materials like a silk scarf, shawl, and curtains.Cobweb Felting
Just like the name suggests, this technique is used to create a ‘cobwebby’ texture on the felted fabric. The technique produces a thin lacy fabric with holes hanging like a cobweb. It is opposite to the basic felting technique. Unlike the basic felting technique where the sheet is felted uniformly preventing any bald spots and holes, we strive for holes thin spots and uneven edges in the cobweb felting. If you feel like being creative and challenging yourself then why not try cobweb felting. This felting technique is used for creating textured scarves and shawls.Resist Felting/ 3D Felting
In this technique, some kind of barrier is used to resist or in other words to prevent the fiber from felting together. It is also one of the techniques used in creating 3D felting. The result is not flat ad creates a certain shape at the end. Certainly shaped barrier made of cardboard, plastic metal, or wood is used to give shape to your felting project. This technique is used to create cat caves, bowls, shoes, baskets, and many more.Lattice Felting
This technique is quite similar to the cobweb felting technique. Using this technique we try to create a lattice pattern on the felted fabric. We deliberately lay the fabric in such a way that it forms holes at the end of the felting projects. There are two ways to obtain a lattice pattern. One easy way is that you first create a felted thin sheet and use scissors to cut a lattice pattern on it. Another way is by laying the wool in a lattice pattern before felting. this way is a bit difficult at the beginning and requires practice to perfect it. You can create beautiful shawls, scarves, wraps, and many more using this technique.How to Felt Wool? – Dry Felting
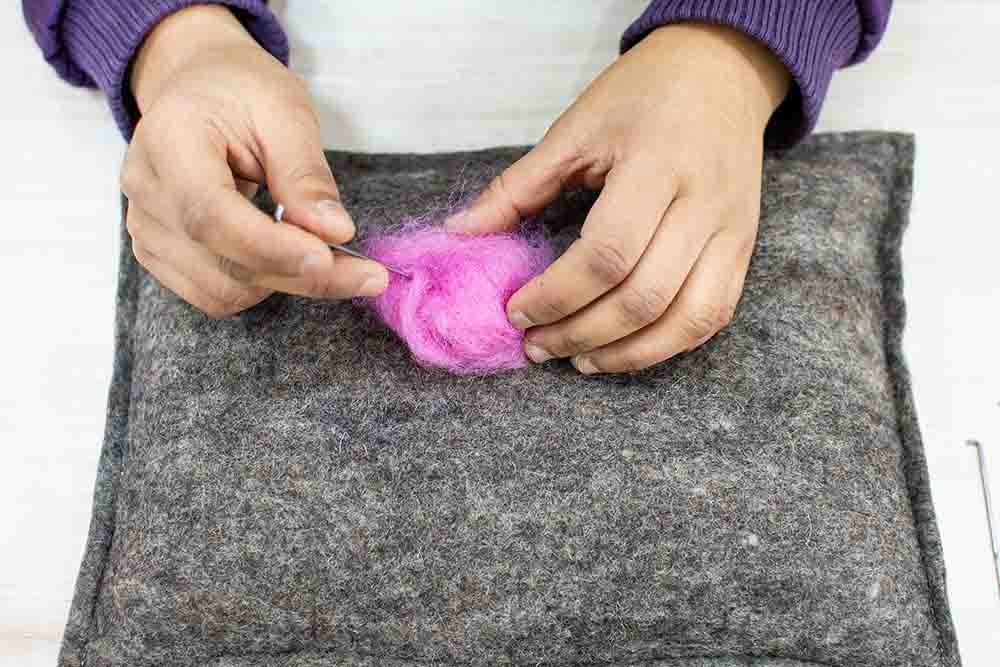
Dry felting is also called needle felting. In this method, we do not use any kind of moisture for felting. A special type of needle with a barbed end is used for felting. The needle is continuously poked into the layers of wool to form a stiff matted felt. You can use either a single needle or many needles you want depending on the felting project you are working on. With this method, you can different beautiful and creative felt projects. Needle felting is a fun way to felt. You can feel a flat piece like in the wet felting and also create a 3D piece. This method is best for creating 3d realistic figures. This method is nod child friendly as you will be working with sharp needles which can cause minor accidents. We recommend you let your chile needle be felt only under adults’ supervision.Dry Felting – Required Materials
This felting method requires a few more tools compared to the wet felting method. You will need a felting surface, a needle with a barbed end, wool, and a finger guide. Here I have listed a detailed description of materials required for dry or needle felting.